Metigy

Creating Google Display Ads: From start to finish

Creating Google Display Ads: From start to finish
support
This article is a walkthrough so you can create your first Google Display Ad using Metigy. You can find the Ads module in the left-hand menu.

Choose your goal, then your Google Ad type

A key part of any ad strategy is the goal of your ad and reflects the kind of bidding strategy and targeting that Google’s platform will use to optimise your ads. The options are:
  • Increase website visits: Get the right people to visit your website
  • Maximise ad reach: Show your ad to the highest number of people
  • Grow your conversions: Encourage customers to take actions
  • Grow your sales: Drive customers to make a purchase decision
Click on the goal you want. Now choose your ad type. For Google, the choices are:
  • Google Search Ads
  • Google Display Ads
In this case, click Google Display Ads.

Add your Google Display Ads Creative

Add your Google Display Ads Creative

When you create an ad, you need to define what creative content you are going to be using. In the case of Google Display Ads, it’s very visual and you’ll start by adding in your graphics and text. As you create your ad, you will be presented a preview of the ad on the right-hand side. Display Ads are made up of an image (or multiple images), and some key text. By default, you are shown the minimum required for an ad. But, a clever thing you can do is add more headlines and Google will create variants of the ad using them. It will then serve those and start to optimise the ad based on the best performing combinations.
  • Images
  • Logos
  • Headlines are the title(s) that appear at the top of the ad. The minimum number is 1 headlines and are a maximum of 30 characters long, focused on catching user attention quickly.
  • Descriptions come below the title and can be up to 90 characters. They are a good way to give the viewer more detail on your product.
  • The final URL is where the ad will click through to. Google will add conversion codes to it for use in Google Analytics if you have it.
As you create the ad, the preview will update. You can switch between the mobile and desktop versions. And if you add more than the minimum content, you can click to see all the variants to serve.

Create your audience

Create your audience

Think of the audience as being the type of individual that you want to see that ad. This ensures that when people search for your keywords, the ad will only be shown to the people you want to see it. The more specific you can be, the better your ad will perform.

Define locations to target

This is an important step to get right and define which geographical region you are targeting. You can go from as big as a country down to as local as a suburb. And the exclusions are just as important. These are regions that you do not want to serve. To add your locations, simply start typing the location and as you do, suggestions will appear. An example might be that we want to include Sydney but exclude Parramatta.

What does your audience look like?

This is all about the demographics of your audience:
  • Gender
  • Age
  • Household Income
  • The language they speak
The recommendation is to try and be specific around all of the settings if you know them. If you don’t leave it broad and then the reporting will let you delve deeper. Or, why not try a new/different audience?

Build your keywords

Now enter your keywords by starting with a product, service, or phrase that is relevant to your business like ‘guitar parts’, and then click to choose at least 10 keywords for your ad. By hovering over each suggestion, you’ll see the estimated number of people this could reach.
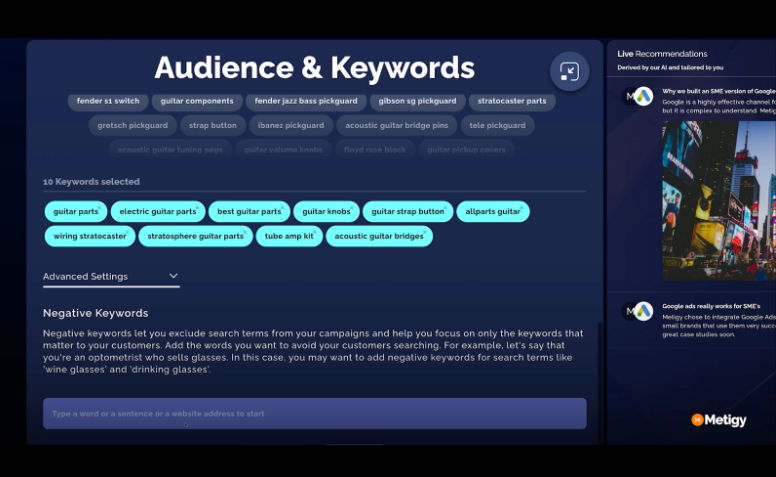
Build your keywords

Select any negative keywords you don’t want included in your campaign. For example, if you sell reading glasses you can exclude irrelevant keywords such as wine glasses or drinking glasses. Click on confirm when you’re comfortable with your keyword selection.

Set up your investment

Set up your investment

Your investment is the budget you want to allocate to your ad over what amount of time. You can choose to have a daily investment – how much you pay per day. Or, a total investment – the total cost of the campaign. If you go with the total investment, you will need to set an end date for your ad. Next, you can choose a bid strategy. This is how much each action will cost you. By default, we recommend Google manages that for you using their AI to optimize. But, if you are perfect, you can manually set the maximum amount for each click. The last part is the timeframe of your ad. Google Ads run better over a longer period (two weeks or longer). You can create the ad and have no end date if you want. Or, you can specify when it will end.

Ad review

Once you are happy with your Ad, click Publish which will submit it to Google for review.

What happens after approval?

Once you click publish, it is submitted to Google for review and approval. This process typically takes 24 hours for Google Display Ads.

Further support on Google Ads

ads, brand awareness, display ad, google, google ads, google display ad, paid media